Crash Restraint Blog Archives (2010-2016)

Two Ways to Add Arms into a Shinju

Topologist

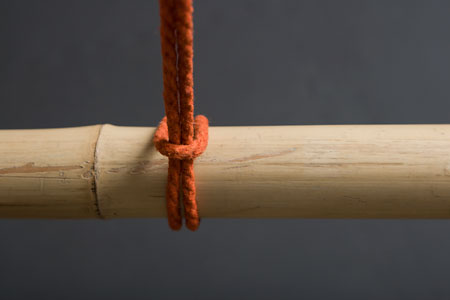
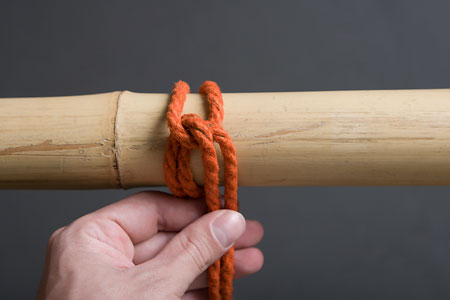
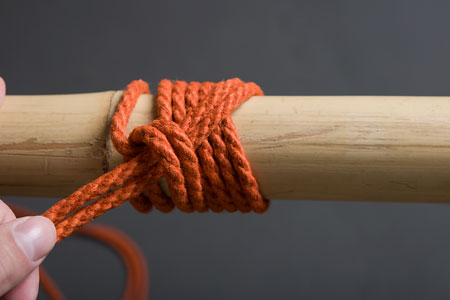
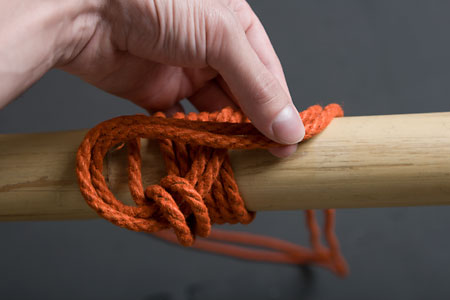
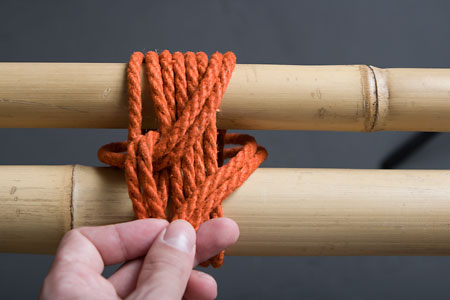
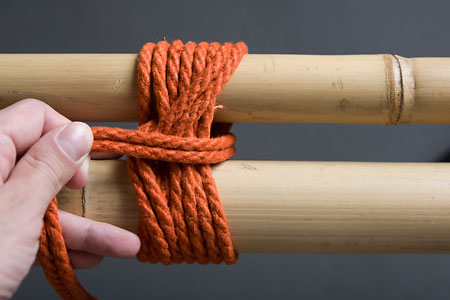
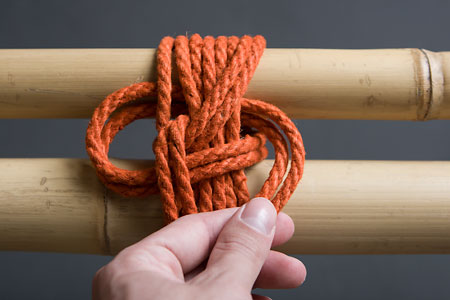
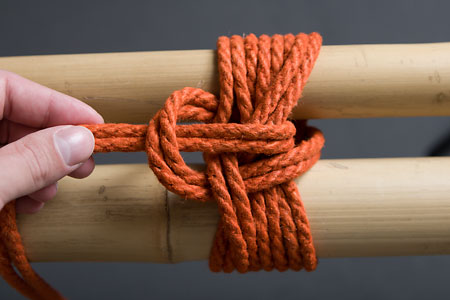
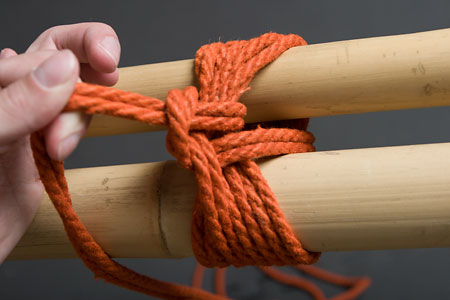
I recently posted videos of two ways to add arms in at the end when tying a Shinju-type chest harness for suspension; one that just adds some simple support wraps, and another that mimics the wraps of a takate kote.

In general, I'm a big fan of tying the arms in last when starting an extended scene, because then I know if the arms/hands start to have circulation/nerve issues, I can untie just the arms and reposition them without having to untie everything else. This makes everybody a lot safer, because bottoms tend to be less reluctant to mention a problem when they know it can be easily fixed and won't spell an end to play.

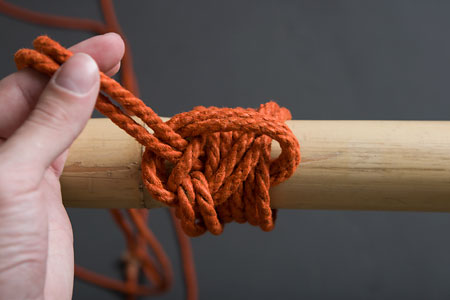
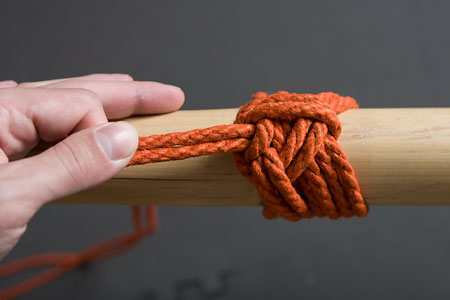
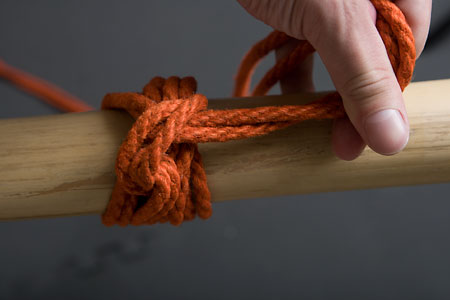
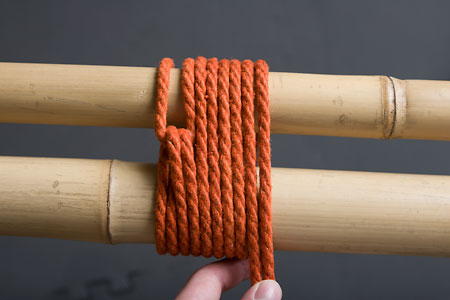
Of course, sometimes you want to get control of someone's hands right away. In that type of situation, one option is to do a temporary wrist tie, then re-tie the hands at the end of tying other harnesses. That way you get all the benefits of having the hands bound for the entire scene, and of being able to easily reposition them.

Read more 0 comment(s)

A Guide to Your First Rope Suspension

Topologist

As I announced on Fetlife a few days ago, I've now finished posting all the required content to guide you through every step of performing your first rope suspension. To add that as a goal and have the system take you through everything step by step, just click this link and you'll join over 150 people already working their way through this free online course.

Do keep in mind that there's no substitute for in-person instruction, and it's always a good idea to have experienced supervision during your first few suspensions. My hope is that this material will improve the quality of information available to those without good local resources, but please don't go it alone -- if there's no expert in your area who can help guide you, at least have a couple friends with you when you're suspending to assist if you get into trouble.

Read more 0 comment(s)

Preparing for Suspension

Topologist

This past week, I've been posting and updating a variety of articles and videos to help prepare you if you're working toward suspension.

My expanded rundown on hardpoint evaluation is a must-read for all rope suspension tops and bottoms; if you're going to be dangling from something, you really want to know that it's not going to suddenly drop you on your head.

I also wrote up an article on what goes into conducting suspension scenes safely, including technical concerns, good communication, and self-awareness.

Finally, I discussed how to select rope for suspension use, then illustrated with videos how to secure your support lines during a suspension, as well as other important aspects of support line handling.

Read more 0 comment(s)

Three Armbinders for Two Arms

Topologist

Armbinders are a tricky tie -- they provide a wonderful feeling of restraint, but often cause nerve and circulation problems. The key to not having to untie your armbinder almost as soon as you finish it is to pick the right technique and level of strictness for your bottom's flexibility.

For escape artists and very flexible bottoms, the Extra Strict Armbinder can be made as restrictive as you could want, while still providing a lot of adjustability to get something sustainable.

When tying someone relatively flexible and not pushing the limits of their flexibility, the Basic Armbinder is a simple solution that works well as a component of larger patterns (such as hogties) because of its construction out of standard column ties.

For maximum comfort, and tying on people with limited shoulder flexibility, the Lace Up Armbinder is a beautiful tie full of creative possibilities. It can also be tied on numbers of arms other than two.

Read more 0 comment(s)

Basic Bondage for the Bedroom

Topologist

Over the past week I've been uploading a bevy of bedroom bondage videos to get you started with some hot restraint at home. One fan even already posted a story of a scene they had using one of these ties!

To start with, you're going to want to equip your bed for bondage. The tie in the story I linked above, which is great for transporting someone to a bed is the classic hands-behind-the-neck position. If you've already got someone on a bed, I showed a quick chest harness you can tie while they are lying down. And of course, if you've got a single or double column tie on a limb, you'll want to use a taut line hitch to tie it off to your bedposts or handy nylon tie-down loops!

Read more 0 comment(s)

Two Crotchrope Videos

Topologist

Just posted are two videos on crotchropes -- one on a basic crotchrope you can wear out on the town, and another on how to use a crotchrope to attach a Hitachi Magic Wand for hands-free (or hands-restrained) vibrating.

It's really hard to overstate how much fun can be had with a simple crotchrope. On one recent occasion, I tied one on a date before going out to a party we thought wasn't going to include play; later in the evening when it did wind up turning into a play party, we didn't have any toys with us, but the crotchrope was just long enough to re-use to tie her hands up for a quick and very hot scene.

Read more 0 comment(s)

New Shinju Videos

Topologist

I posted videos this week of how to tie two versions of the classic Shinju chest harness; one is a more traditional variation which makes a good first technique for beginners to learn, the other is one of my own design that is optimized for suspension.

Also recently added are videos on the sheet bend technique I use to extend ropes, and how I keep track of the center of my rope.

Read more 0 comment(s)

CTKv4 Updates

Topologist

I've added some new information to the CTKv4 article, including:

Ropeboi also pointed out to me that I failed to mention in the list of benefits of the split stem how much more comfortable it makes this TK for lying on your back in! BondageNexus posted a great photo illustrating this.


Read more 0 comment(s)

Chest Loading Takate Kote Version 4

Topologist

I've just posted a video and in-depth article on the latest version of my chest loading TK. For those using and happy with one of the earlier versions, you may still find some of the information in the article relevant, as I delve in much more depth into the theory and design principles behind the CTK.

Read more 0 comment(s)

A Fast, Partially-Chest-Loading Takate Kote

Topologist

WARNING: This tie is highly experimental -- recommended ONLY for careful use by very experienced practitioners.

Here's a new design based on two premises:

  1. That the lower wraps should be the main concern in relation to radial nerve injury
  2. That the upper kannuki are not really needed for much

While to my mind these proposals are both far from proven, if one takes them to be correct, then this is the TK I think one would want.


The lower wraps are done according to the Version 3 CTK method; in my very limited testing with one bottom, this approach put the most noticeable amount of load on the lower ribcage in almost all positions, and was generally at least as stable as a traditional 2-rope TK. While for some bottoms the load on the ribs will be problematic as shown, tensions could probably be adjusted to put more force on the upper wraps and/or lower arms if desired.

How you attach support lines is very important to avoid the issue that Esinem succinctly illustrates...

Read more 0 comment(s)

Version 3 Chest-loading Takate Kote

Topologist

Important Update: There is a newer version of this tie published; this article is of purely historical interest.

I have previously posted two TK variations designed to transfer load from the arms to the chest. I won't repeat the justification for why you might want this, but will briefly remind you: these ties are hopefully safer than traditional variations, but still may be highly dangerous, particularly if misused; pay careful attention, use good judgment, and above all seek qualified in-person instruction before attempting to use these for suspension.

Over the past year and a half or so, since originally publishing a CTK, I have continued to experiment with various designs based on the same principles. My currently preferred variation generally requires at least 3 ropes, due to an unusual start which I'll explain the reasons for at the bottom, once you've seen what I'm talking about. While any variation using half-hitches in the way this one does may be considered...

Read more 1 comment(s)

Attaching Support Lines

Topologist

When attaching support lines to a harness for suspension, I use a novel method that people frequently ask me about, and I've been meaning to document for a long time. Serendipitously, I ran into Kali from Kink Academy a few months ago at Wicked Grounds, and she asked me to film some instructional videos for them on suspension -- so I managed to slip this in there, and they've graciously agreed to allow me to use screenshots from those videos to illustrate a blog post here.

This method was inspired by the Tatu hitch, during a Fetlife discussion whose details are now murky in my memory -- in any case credit is due both Tatu and Jack Elfrink for making me aware of that knot, upon which this is based. Things needing names, and this technique using the first half of a Tatu hitch, I suppose we could call it the half-Tatu hitch.

Thanks also to Mecha-Kate for modeling for these. The full video version, in two parts, is here and here on Kink Academy. It's not free, but...

Read more 6 comment(s)

A Column Tie for Beginners

Topologist

This is a column tie specifically designed to be easy to learn for people brand new to rope. It is an adaptation of a tie I learned from Nell, who learned it from Max, who developed it based on earlier work with yet murkier origins. As far as we can agree, the most historically accurate and descriptive name for this would be the Double-Modified Fishermen's Bend.

Thanks to Nell and Max for help producing the video, as well as introducing me to the original concept, although I hasten to add that what I present here is not Max's canonical version of the tie, and any pitfalls should be solely attributed to my own tinkering with it.

It's also worth noting that none of the three of us use this in our daily tying -- various more advanced column ties are quicker with sufficient practice -- but this is a good place to start if you're just looking for something easy to tie someone to the bed with.

You might notice that in the single-column video I do four wraps, and in the...

Read more 3 comment(s)

A Chest-loading Takate Kote

Topologist

Important Update: There is a newer version of this tie published; this article is of purely historical interest.

There is some debate in the community over the relative safety of the takate kote for suspension; regardless of how you feel about that, you may find these variations useful. The general idea is that by adding a few well-placed knots, suspension load can be shifted from the arms to the chest, while maintaining the general look, feel, and experience of a normal TK. Most bottoms seem to find this more comfortable, and my hope is that it will prove safer.

Some disclaimers:

First of all, watching these videos does not make you qualified to do this tie. These are intended for an audience already familiar and comfortable with tying and suspending with TKs; no attempt is made to cover the general safety information necessary to use these responsibly.

Second, while I have solicited feedback from a number of other riggers, and done extensive testing on a small number of bottoms,...

Read more 10 comment(s)

Reverse Somerville Bowline for Resistance Play

Topologist

I mentioned when I first posted the RSB that I considered it particularly useful for tying someone who was struggling, because it didn't require leaving room to pass a line under the cuff. However, if you're going to leave someone in a tie for a while, or if you're going to suspend with it, you don't want the cuff too tight. I recently had exactly this situation come up in preparing my performance for Citadel's post-pride party/demos, where I wanted to do a "take up", tying a struggling bottom into a puppet suspension.

It turns out, you can actually tie the RSB onto a moving target in a way that maintains space between the cuff and the limb. Here's a quick, unscripted video, just to show putting a bunch of column ties onto someone who's resisting:


And here's an illustration/explanation of what I was doing, there:

Read more 4 comment(s)

Slipped Somerville Bowline

Topologist

Personally I've never found any particular need for this -- I don't usually want to release a column tie while loaded -- but there was some previous discussion in which people were bemoaning not being able to untie a Somerville Bowline while under tension.

So if, for whatever reason, you want an ultra-quick-release column tie, here's a simple modification:

This has, I think, everything you could want in a quick-release knot -- when in the "locked" configuration, it would be very hard to release accidentally (and in fact you can tug on the bight all day long) -- but when you want to release it, it takes no force at all to unlock and then a single good yank not only releases the knot, but simultaneously unthreads the wrap passing under the cuff.

I'd say this is pretty inarguably easier to release than a Boola Boola, while also remaining more secure (if anything, it's even less likely to capsize than a normal Somerville Bowline).

Lochai also has a...

Read more 9 comment(s)

Reverse Somerville Bowline

Topologist

I've been sitting on this for a while, mostly because I'm not set up to do video, and people seem to prefer that to photos, but I finally gave in and just shot something off quickly with my phone gaffed to a tripod:

This is a fairly tricky knot, and finicky even once you know it, but in certain situations it is invaluable, most especially this one:

You might ask "but why can't I just do half hitches around the leg, like everybody does?". And the answer is that, if you really load that, from the standing line end, it tends to pull on just the first wrap, and cinch down -- it's not a real column tie. You'll notice that the tutorial I linked that image from then goes on to run the line back up to the harness, which is the usual way to avoid the issue; but with the RSB, you don't have to go back, you could end your rope at the cuff, or do another cuff further down the leg.

When I demonstrated this a while back at the last CT Grue, someone asked...

Read more 2 comment(s)

Reverse French and Portuguese Bowlines

Topologist

There's been some discussion recently of reverse bowline column ties. Jack has long had posted on his site the Reverse French Bowline, a knot which I never paid much mind on account of his warning that it can collapse when the standing line is loaded (as one would expect, from the construction of the knot). However, WykD Dave points out that this is actually a very appealing way to begin a takate-kote.

Further, it turns out that this is actually the same as David Lawrence's Reverse Portuguese Bowline -- a knot I've wondered about for some time. So that begs the question..is it French, or is it Portuguese? For reference, here are the French Bowline and Portuguese Bowline.

I'd argue that Jack is correct in his naming -- the reverse bowline he demonstrates shares two key properties with the French Bowline -- only a single line passes behind the cuff, and the whole cuff is bundled together. A Reverse Portuguese Bowline should pass both sides of the bight under the...

Read more 0 comment(s)

New Video Tutorials

Topologist

RiggerJay had me record some video tutorials of my new column ties for Boston Rope Group last week:

My original pictorial explanation of the Somerville Bowline is here.

Read more 0 comment(s)

Larks-head Based Single Column

Topologist

I was surprised not to be able to find this tie, which to me is the single most fundamental column tie, documented anywhere on the internet or in the books that I own.

You start with a lark's head about the column:

Then reverse directions:

And wrap around to the desired cuff width:

Now if you look back to the beginning, there are two interlocking bights, one in a single line, the other in doubled rope. Pull the working end all the way through the doubled one:

Now reverse directions, and make a loop over the cuff to the opposite side:

And then run the line back under the cuff, and up through the loop:

Then tighten it down:

This is great if you're going to be pulling directly away from the column, or along it in the direction that you passed under the cuff. However, you'll notice that if you pull in the opposite direction, it tends to make the cuff roll over and bunch up:

To avoid this, if you're going to be pulling in that direction, perform...

Read more 0 comment(s)

Larks-head Based Double Column

Topologist

This is the double column version of the lark's head based single column. It starts the same way:

At this point, instead of hitching off the cuff, wrap all the way around the back of the cuff, going between the columns:

Adjusting the tension on this cinching wrap is what determines the overall snugness of the cuff:

At this point, there are several ways to finish it off. One is to split the lines around the front of the cuff and tie a square knot; that doesn't require much space between the columns, but had the disadvantage of only pulling on the back of the cuff, which can make it feel like it's tightening under tension. An alternate approach is to now hitch off the front of the cuff, similar to the single-column version, by first passing through the starting doubled-rope bight:

Then forming your hitch about the opposite half of the front of the cuff:

This will pull on the front and back of the cuff evenly, which is generally more comfortable. You'll notice,...

Read more 0 comment(s)

The Slipped Overhand Cuff

Topologist

This cuff is useful as what I call a "second column" tie -- for a situation where you've already got something attached to your rope, and want to now attach the line to a single column, while the standing part is under tension.

To start, make a slipped overhand knot in the standing part, such that the working end (not the side already tied off) can slip through to enlarge the loop:

Now take the working end around your column, and through the loop:

The nice thing about this tie is that once you get to this point, just hanging on to the working end will support the column / maintain the tension. Ignore the knot where the rope changes color -- that's just to make the lines contrast so that it's easier to see what's going on.

Next, you want to adjust the loop so that it ends just a little bit above the top of the column, by pulling rope through the knot to elongate (or, if necessary, shorten) it; this is also your last chance to adjust the overall...

Read more 3 comment(s)

The Somerville Bowline

Topologist

The Somerville Bowline is not, technically, a bowline. Rather, it is actually based on ABOK 1445, sometimes later called the Myrtle Hitch. However, I call the cuff the Somerville Bowline, because its intent is to combine the speed of the Portuguese Bowline with the compactness of the French Bowline -- and it was invented in Somerville.

[Update: for videos of this tie, see here]

As a Single Column

Start as for most cuffs that use the bight as the working end, by taking a few wraps:

You'll notice I have a magic rope here that changes colors at the end. This is just to make it clearer what's going on -- don't freak out! You'll only be using one rope in reality.

OK, next, take the working (bight) end and wrap it 360 degrees around the standing (long) line, going in the natural/easiest direction (it has to be this particular direction! which just happens to be the most natural one, if you ask me):

Now, pull on the working end while leaving the standing line slack, to...

Read more 4 comment(s)

How to Tie Your Shoelaces

Topologist

I've oft heard the adage repeated by bondage instructors that if you can tie your shoelaces, you can do rope bondage.

Now, personally, I've always preferred shoes with velcro. But it did get me thinking -- shouldn't the inverse also be true, that if you can do rope bondage, you should be able to tie your shoelaces?

Because I've been tying my shoelaces poorly for years. In fact, I bet most of us have. The only two methods I was taught as a kid were:

  • The bow. Easy to tie and untie, compact and attractive. But in all but the stickiest of shoelaces, it inevitably falls apart before you get halfway down the block, leaving your laces trailing.
  • The double-knotted bow. Taking the loops of the bow and tying an additional overhand makes it nice and secure. But now you've got a huge-ass knot that is difficult to undo one-handed; worse, sometimes when you undo the final overhand, one of the ends pulls out the wrong way through the bow, resulting in an even harder-to-get-out knot.

...

Read more 2 comment(s)