Takate Kote Wrap Positioning Survey Results
Some of you may recall that a number of months back, I conducted a survey on where bottoms prefer the wraps of a TK to be positioned, and what sorts of problems they have when the placement is contrary to their preference. After a bit of a detour through teaching myself R, getting distracted by Shibaricon season, etc, I've finally wrapped up an initial analysis of the results.
Background
Takate Kotes (also known as box ties) are a type of tie that involves two bands of rope around the upper arms, as pictured below.
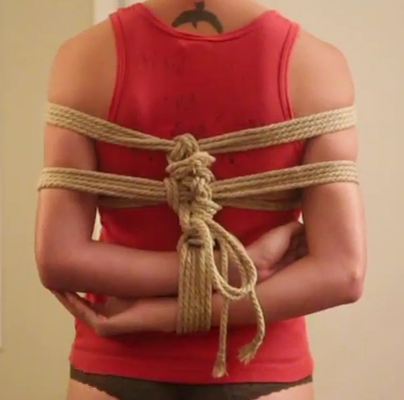
Because the radial nerve wraps around the upper arm in the general area where these bands of rope are positioned, when TKs are used for suspension and body-weight-scale forces are placed on the ropes around the arms, there is a risk of the radial nerve being compressed. This can result in an injury know as "wrist drop", where motor impairment from an injured radial nerve causes the person being tied to lose the ability to extend their hand/wrist -- a seriously debilitating condition which can take months to heal, sometimes without full recovery.
Anecdotally, wrist drop is one of the most common serious injuries amongst practitioners of rope suspension; there is significant controversy over to what extent this is due to bad technique of individual practitioners, vs. inherent relative dangerousness of TKs, vs. popularity of the TK as a suspension tie.
Overall Conclusions
It hopefully won't come as a shock to anyone that the results of this study reinforce the fact that there is no generally safe placement for TK wraps. It does appear that where it comes to the top wraps, from a nerve safety perspective, it's consistently better to err on the side of placing them as high as possible (subject to concerns of comfort and tie integrity).
In terms of lower wraps, it's hard to draw firm conclusions about where the most vulnerable points are likely to be for the radial nerve -- there's evidence to support possible vulnerability extending from at or just below the deltoid/tricep gap, all the way down to the area above the elbow where the ulnar becomes vulnerable. I suspect, from the lack of a clear pattern in the data, that there may actually be multiple areas of vulnerability involved -- i.e. that a single bottom might have a point of high vulnerability just below the gap, then a less vulnerable area, then an area further down that becomes more vulnerable again. But that's just conjecture.
The other key finding is that the majority of bottoms have had comfort and/or safety issues when suspended in TKs, even when the rope is positioned ideally for them. I hope bottoms will take that as a cue to be confident in speaking up when a TK isn't working for them, and to feel justified in urging their tops to seek safer alternatives.
Terminology with Regard to Placement
In the charts that follow, the labels are shorthand for the following descriptions used on the survey:
High Deltoid: "Well up on the deltoid"
Low Deltoid: "Just at the bottom of the deltoid"
Gap: "In the gap between deltoid and tricep"
Midpoint-Gap: "Below the gap between deltoid and tricep, but above the midpoint of the upper arm"
Midpoint: "Around the midpoint of the upper arm"
Low Midpoint: "Just below the midpoint of the upper arm"
Below Midpoint: "Well below the midpoint of the upper arm"
Test of Specific Theories
My primary motivation in constructing this survey was to evaluate the accuracy of a variety of notions that I have seen thrown around regarding "safe" or "correct" placement of TK wraps. What follows is a selection of theories that have been put forward in the past by various parties, or were matters of common lore, and the conclusions I believe we can draw about them from this data:
Theory: The upper half of the upper arm is relatively safe for the radial nerve.
Prediction: If true, you would expect most radial nerve problems reported due to wraps being positioned on the lower half of the arm.
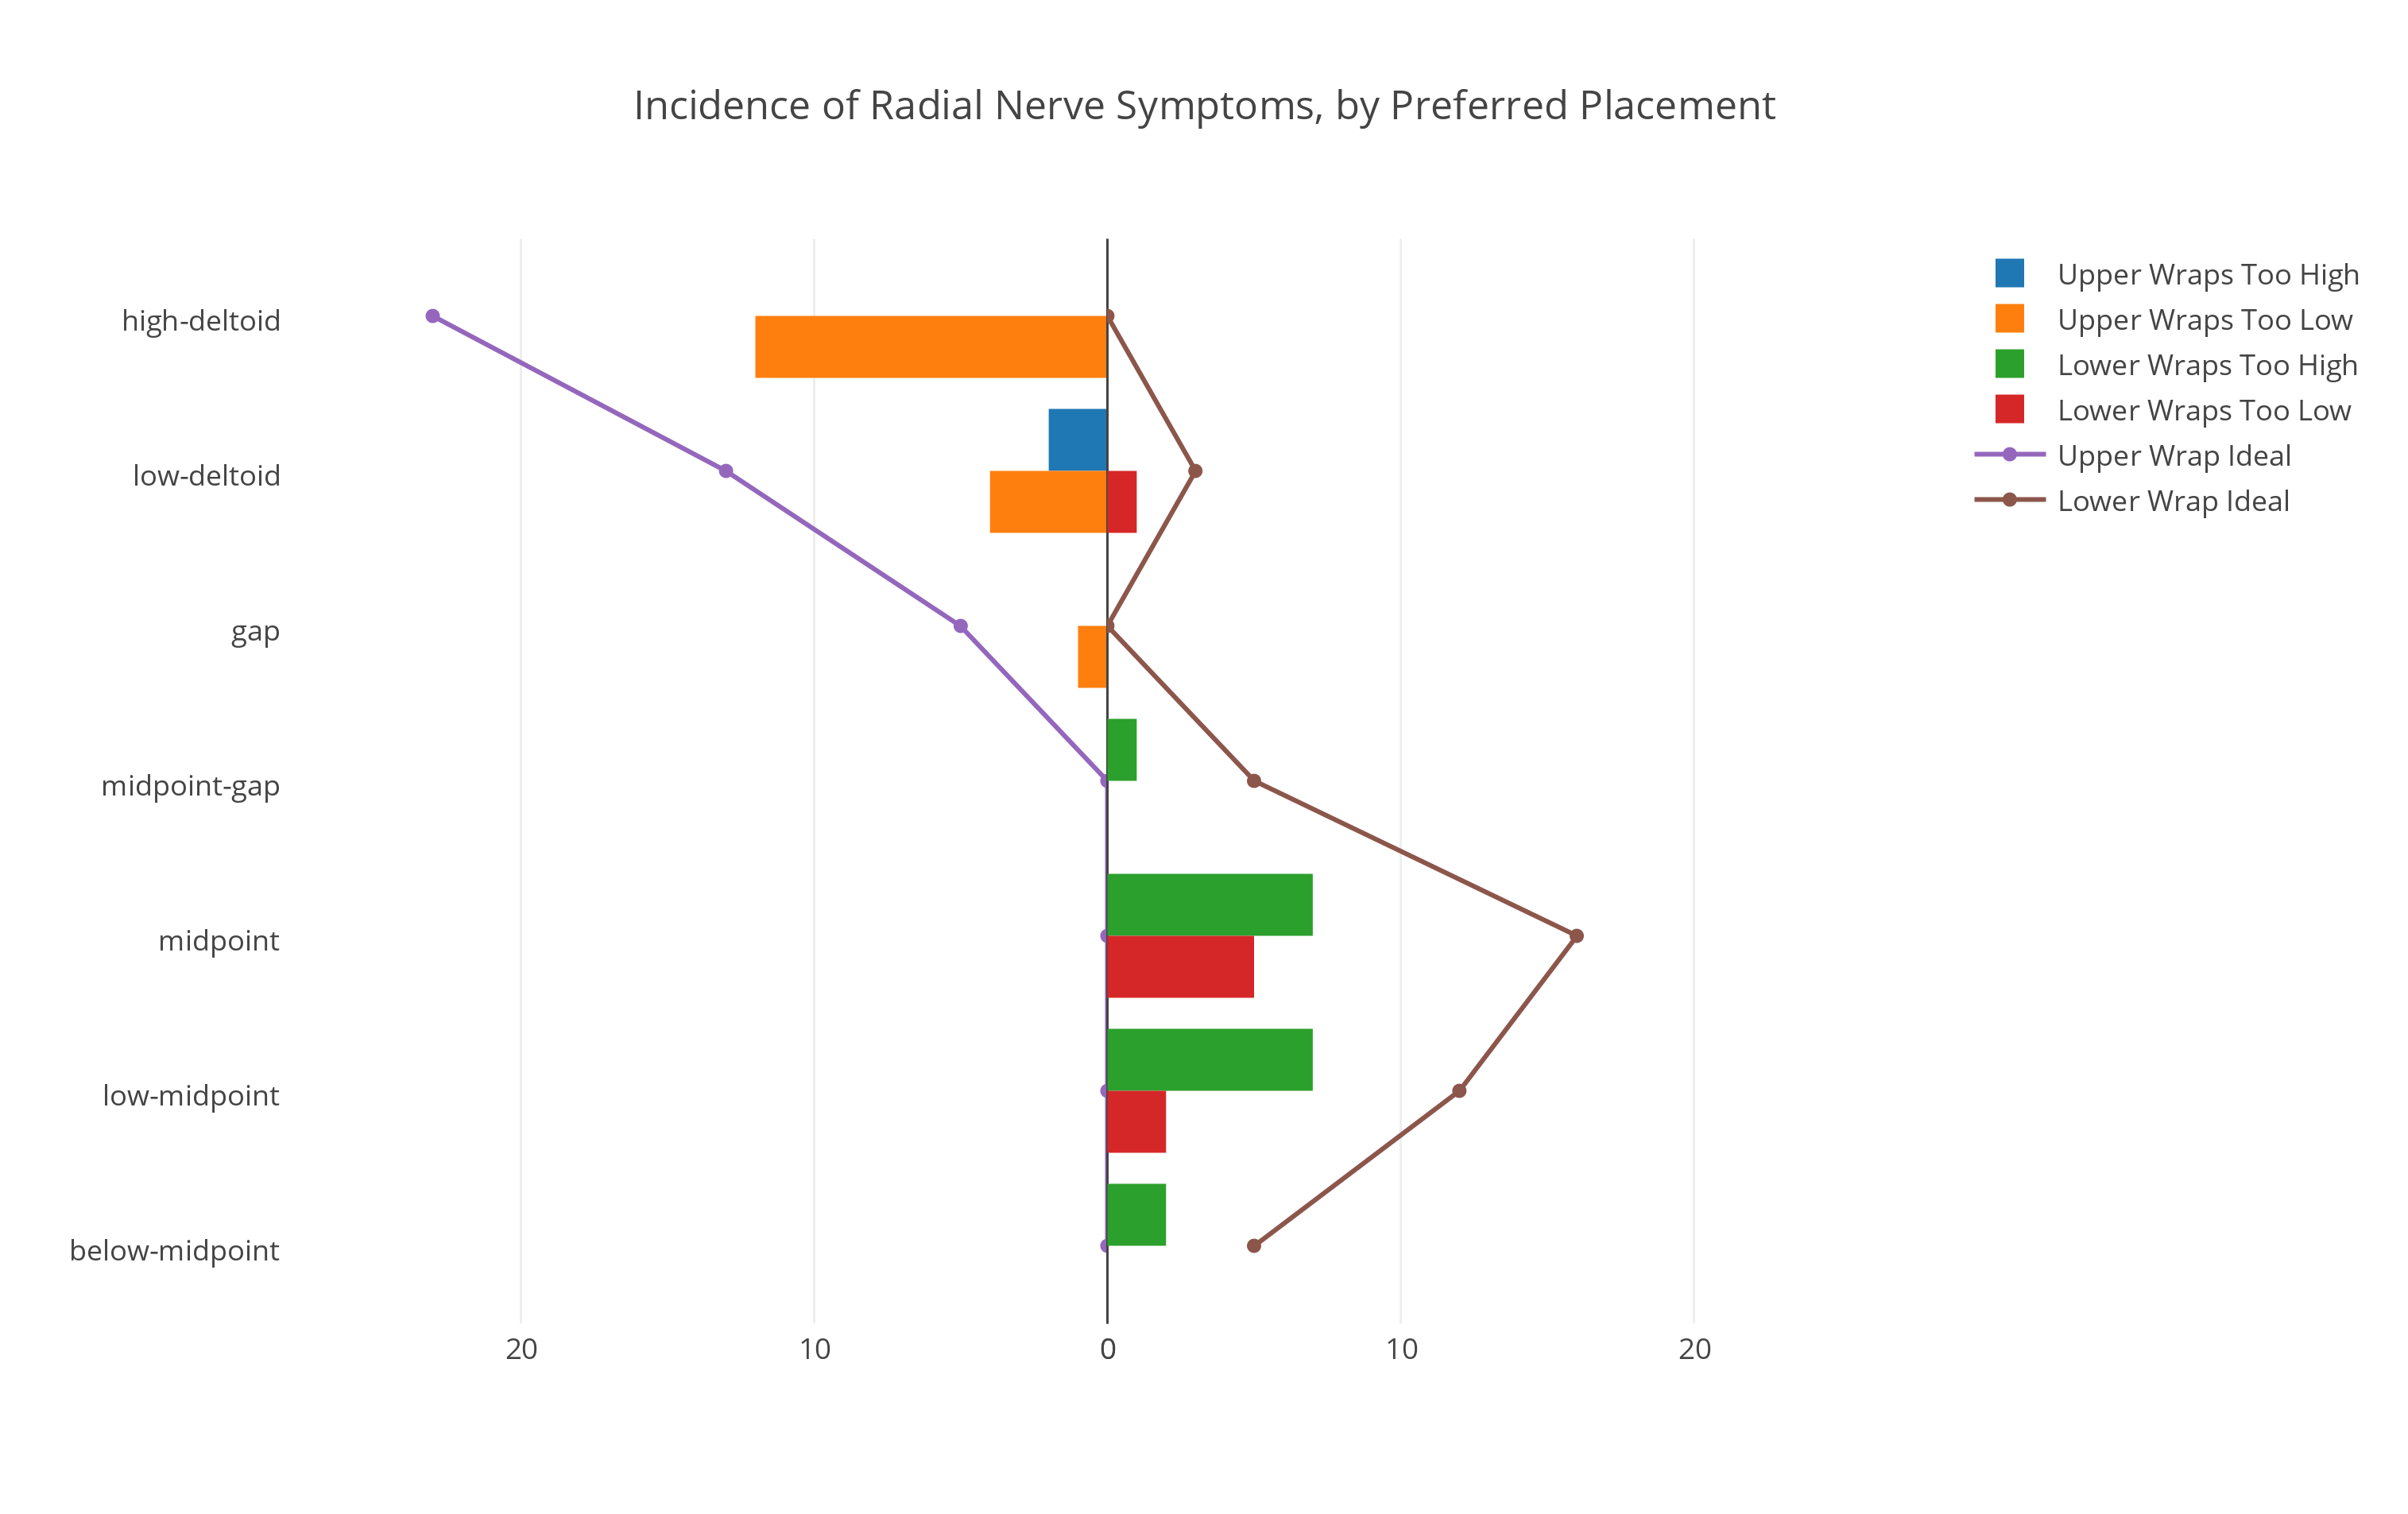
Conclusion: FALSE. If you look at the below graph of reported radial nerve problems in relation to preferred wrap placement, you can see that the most popular placement for lower wraps (brown line) is around the midpoint of the arm, and that for those respondents, more problems (green bar) are reported due to the wraps being too high (and thus above the midpoint of the arm) than from them being too low (red bar). This provides clear evidence that the radial nerve can frequently be vulnerable above the midpoint of the upper arm.
Theory: Proper wrap positioning leaves only a small gap between upper and lower bands.
Prediction: If so, fewer problems should be reported in ties with ideal placement for bottoms whose stated preference is for wraps close together.
Conclusion: Unclear. Only 6 respondents reported an ideal wrap positioning with less than a 3-rope-width gap between bands, and of those, half were using an atypical super-high wrap positioning strategy, with both sets of wraps above the deltoid-tricep gap. Lack of popularity might be evidence for closely spaced wraps working poorly, or just for people never trying it.
Theory: Upper kannuki digging into the underarm are responsible for a substantial fraction of nerve issues.
Prediction: Since higher upper wraps decrease the amount of space between arm and body for the kannuki, and increase the chance of kannuki deflecting under the armpit (and thus being able to load the body there), we'd expect to see incidence of ulnar-related and/or generalized tingling increase as upper wraps get higher.
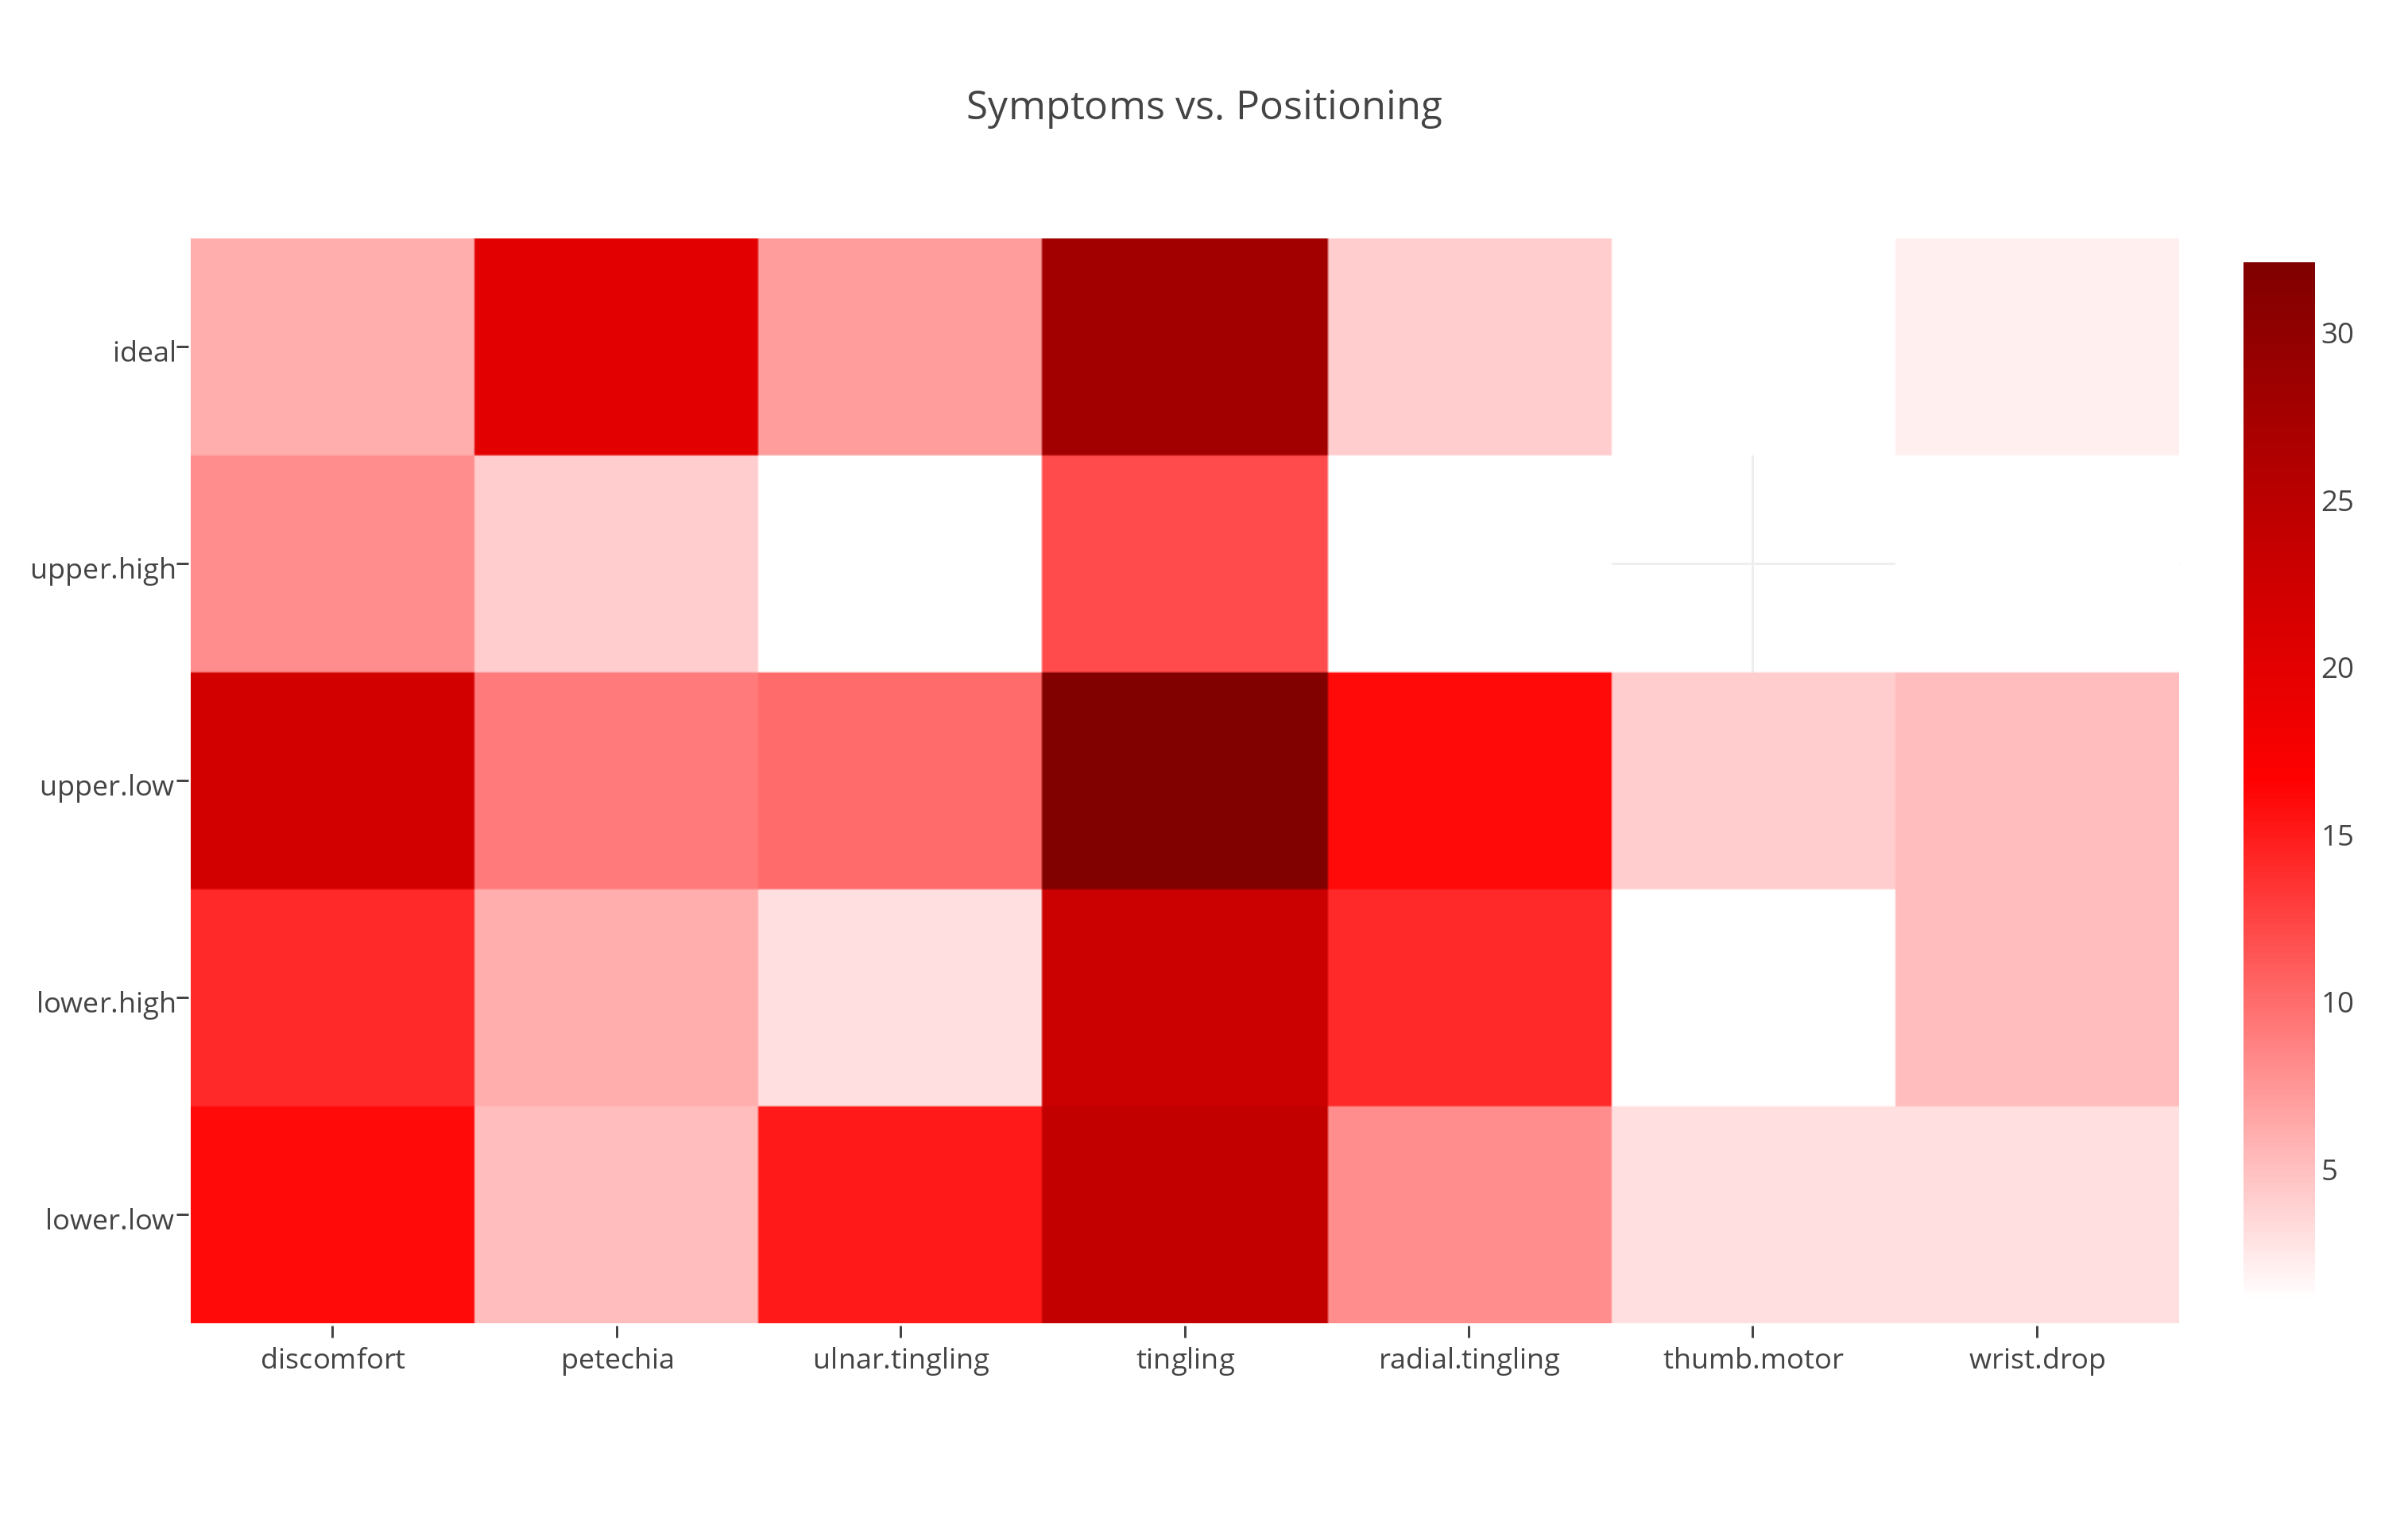
Conclusion: FALSE. In the heatmap below, you can see that ulnar-related tingling (third column) is primarily reported due to lower wraps being too low (bottom row), and that upper wraps being too high (second row) is the least indicated cause of both ulnar-related and generalized tingling (center column; the most reported symptom).
Theory: It's bad to place wraps in the gap between deltoid and tricep.
Prediction: If true, you'd expect a surplus of problems reported when wraps just above the gap were too low, or just below the gap were too high. You'd also expect in the gap to not be a popular placement.
Conclusion: Probably true, but not necessarily because the radial nerve is there. If you look at the graph of radial nerve symptoms vs. placement above (top graph), it's clear that there is a potentially vulnerable spot somewhere between the gap and the midpoint of the arm, but seems to suggest that that area may be just below the gap rather than in it. The heatmap directly above indicates that top wraps being too low is the leading cause of general tingling and petechia, suggesting that there may be a common circulatory vulnerability in the gap, distinct from a radial nerve vulnerability that may be just below it. This would also explain why both placements are equally unpopular.
Theory: Most radial nerve injury is caused by the lower wraps.
Prediction: If so, reports of radial nerve problems due to lower wrap positioning should be significantly greater than due to upper wrap positioning.
Conclusion: It depends where the upper wraps are. Almost no radial nerve problems were reported due to upper wraps being too high. Thus, if tied with the upper wraps sufficiently high, it should be true that the lower wraps represent the main risk. However, it's not entirely clear what constitutes "sufficiently high".
Source Data
Because the survey is no longer online, it may be helpful for you in reviewing the data to reference this screenshot of it. All the relevant data, documents, and code used for this analysis, including complete survey responses (excluding only identifying information) are available on this public github repo. Most of the above analysis uses the data from the "trimmed" file, from which I removed responses which appeared to be confused about what the survey was asking for, not following the instructions, or reported an experience level of <5 suspensions -- in total I discarded 12 out of the 53 survey responses.