Hardpoint Evaluation [Level 3]
It's recommended to learn the following techniques before attempting this one:
Introduction
A hardpoint, in bondage parlance, is something overhead from which you support your bottom when performing suspensions. Some of the most serious publicly reported bondage injuries have occurred when a hardpoint failed during suspension; while hardpoint failure is relatively rare, it tends to be sudden and catastrophic. Thus, it's important to think critically about what sort of structure/hardware you are going to be entrusting a person's life and limb to.
Evaluating hardpoints is not a skill only for tops; except in the context of a full-time power exchange relationship, inspection of the hardpoint should be happening before and outside the scene -- so there's no reason the bottom shouldn't take equal responsibility and initiative for ensuring the safety of whatever they're going to be hung off of. In fact, I wrote the original version of this article specifically with bottoms in mind, for inclusion in Evie Vane's book on rope bottoming. As with most safety matters, the bottom has the most at stake, and I believe they should be an active participant in evaluating the safety of any play situation.
If either party in a suspension scene has any concerns about the hardpoint, that should be part of the negotiation of what risks are acceptable for that scene. It's never wrong to ask your partner how they determined that something is sufficiently safe; if they dodge or are offended by the question, you should be looking for a new partner.
Evaluation Strategies
There are, generally, three approaches to evaluating a hardpoint:
The “Two Big Guys” Test
There’s a notion, in certain quarters, that if you get two big guys to test-hang from a hardpoint, or even bounce around from it, you have then “proven” it safe, since it just took a load far in excess of what’s expected during the suspension to follow. This is a complete fallacy and you should not only avoid using this test, but avoid anyone who uses it.
The problem with the logic here is that just because a piece of equipment sustained a certain load once, doesn’t mean it will sustain it again in the future. In fact, the test could even be the thing that weakens the equipment to the point where it fails the next time it’s loaded. Think of what happens when you bend a paper clip back and forth until it breaks -- it’s not that you bent it hardest the last time; it’s that all the previous bending weakened it until suddenly it let go.
Banking on the “track record” of a hardpoint that, for instance, 100 other people have suspended from without incident is essentially the same as the Two Big Guys test; all you have proven is that it didn’t fail last time -- which is to say it's just like every other piece of gear that had never broken before, until the time it did.
Direct Inspection
This is the gold standard for evaluating a hardpoint. It means that you personally, on this occasion, right before going up, looked at every part of the rig and you were able to determine from that inspection that each component was properly assembled, sufficiently strong, and not showing signs of excessive wear.
One of the hardest parts of direct inspection can be estimating the strength of the materials you are looking at. You want each component to have a breaking strength at least 10x the amount of weight you expect to put on it. Some materials have counterintuitive strength and wear characteristics, so it’s best to be familiar with the technical specifications for the particular components involved -- but in everyday terms, you should be looking at something it would take an unimaginable amount of force to break. As in, if you saw it in pieces, your first thought would be, “Holy crap, how in the world did that happen -- Godzilla?”
Another way of evaluating a component is to consider what its normal use would be -- if something is designed for the purpose of dynamically supporting humans in applications where failure would result in injury, it’s probably appropriate for suspension bondage (assuming it’s installed properly!). Examples are equipment made for rock climbing, or for swingsets.
Knowing the Point’s History
Sometimes it’s not practical to inspect every aspect of a hardpoint immediately before your scene. While not ideal, in these cases you are forced to rely on information about how the rig was designed and its condition at some past point in time. The questions you should ask yourself when evaluating the quality of such information include:
- How credible is the person who installed or last inspected the point? Do they have relevant professional expertise and certifications that would allow them to determine its safe loading?
- Was the person who installed or inspected the point doing so with your current use of the equipment in mind?
- What events could have transpired since the point was inspected? Has it seen a lot of use? Could someone have monkeyed with it and compromised its safety?
- How trustworthy is the information? Did you get it straight from the mouth of the person who performed the installation/inspection, or is it more like a fanciful piece of local lore that everyone tells each other to avoid uncomfortable questions?
Don’t be too generous in assuming that other people in the rope scene know what they are doing. I’ve discovered improperly assembled frames in use in the play spaces of several major BDSM events.
Specific Types of Equipment
Freestanding Frames
This is my favorite type of hardpoint to use, not only for the versatility (as you can frequently tie to many different points on the frame), but because you can almost always easily inspect every aspect of the equipment.
As well as visually inspecting a frame, it’s a good idea to swing around a bit on it and see how it behaves under load. Do the structural members deform? Are the joints loose? Do its feet slide/walk around? All of those are danger signs you should pay serious attention to -- they may not completely disqualify it, but they’re definitely an indication you need to do some extra diligence to ensure it is safe enough for your intended use.
Tripods
One popular design for portable frames is the tripod. Be aware that some tripods can be tipped completely over if you swing too hard on them; it’s a good idea to test out the safe range of angles before going up. Some lightweight tripod designs may deform a bit under normal use -- if you’re going to accept such deformation, make sure it’s on the basis of knowing yourself to be within the design specs.
Also be especially vigilant about proper assembly with portable frames, and pay attention to the section on eye bolts below for those that incorporate an eye bolt rather than welded-in-place attachment points.
Most lightweight tripods are designed to be loaded only from the top; don’t grab on to or otherwise support your weight directly from one leg of the frame.
Eye Bolts
An eye bolt is a bolt with a round hole/ring at one end that you can attach to. Some light-duty eye bolts are constructed of a metal rod bent into a circular shape, leaving a small gap in the loop; those should never be used for suspension, as they can fail catastrophically by suddenly opening up during use. Eye bolts suitable for suspension may be forged, cast, or welded, but in every case should have a smooth, uninterrupted ring of metal where you are clipping in.
Bad; this 1/4" bent eye bolt has a WLL of only 200 lb.
Better; this 3/8" welded eye bolt has a WLL of 1000 lb.
Best; this 3/8" forged eye bolt has a WLL of 1200 lb.
In order to inspect an eye bolt, it needs to be of the type that goes all the way up through whatever it’s attached to, and you need to be able to see the nuts on the other side, to ensure they are still snug. Such bolts should ideally be installed with two nuts, the top one being a locknut (meaning it resists loosening under torque and vibration). Make sure that there’s no chance of unscrewing the bolt by rotating in suspension; generally a climbing swivel or similar gear should be rigged between the bolt and the suspension ring, to prevent rotational forces being transmitted to the bolt.
Bolts that just go up into something and disappear -- and in particular lag bolts (which are like a big wood screw) -- are impossible to inspect and should be viewed as highly suspect.
Bad; this is a 1/4" bent lag eye of the type that screws into wood; no WLL is supplied. So basically every possible thing is wrong with this bolt. You'll see people suspending off crap like this all the time. Note who they are to avoid playing with later.
It's also important to know that eye bolts are only made to be loaded in-line with the bolt; there are certain eye bolts (shoulder bolts) that if installed properly can be loaded at a slight angle. However, as a rule, an eye bolt sticking out the side of something is not properly installed; do not use it as a hardpoint. There are some illustrations here of improper eye bolt loading.
Understanding Working Load Limit
Working Load Limit (WLL) or Safe Working Load (SWL) refers to a calculated allowable load already incorporating a safety factor; however the safety factor used for equipment not designed for human lifting is usually less than the 10x we want -- 3-5x is most common. Ideally, find out what the safety factor (or "design factor") is, then multiply the WLL by that, and divide by 10 to get your load limit. If no safety factor is listed, I recommend assuming a pessimistic minimum breaking strength (MBS) of 3x the listed WLL.
Chains and Slings
The surest way to attach to a beam is when you can put something all the way around it. The two most common options for this are metal chains and nylon slings/webbing. When inspecting such a setup, there are four main things to look for:
- Strength: Chains should be appropriately rated, nylon webbing should be at least 1" and climbing-rated.
- Condition: Check chains for corrosion and webbing for roughness/fraying; also make sure webbing is protected from any sharp surfaces that could cut/abrade it during use.
- Connectors: Make sure quick-links used to join chain are sufficiently rated and fully closed. Slings should be tied with a water knot; make sure there are several inches of tail on both sides of the knot. Check for frayed stitching on sewn slings.
- Angle of Force: The open space between the bottom of a beam and the sling wrapping it forms a triangle; if the sling is tight, and the space is smaller than an equilateral triangle, the force on the sling is substantially increased. Keep a big triangle unless you really know what you're doing. Here's a basic reference on sling angle/forces.
Anchor Shackles
You'll sometimes see this type of shackle used in bondage rigging:

That image is from this article on use of anchor shackles in their eponymous application. The most important thing to note is the wire seizing that prevents the pin from coming unscrewed. That is the proper way to install one of these, but I have never once seen it done when being used for rope bondage.
Another important thing to understand is that anchor shackles are only made to be loaded with the direction of force centered on the pin:
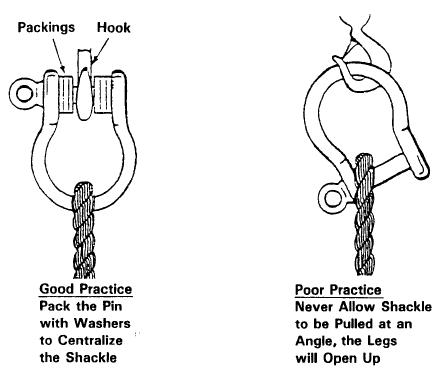
I've most frequently seen anchor shackles installed at right angles to this, as if people are trying to keep load off the pin -- that is exactly wrong and drastically derates them.
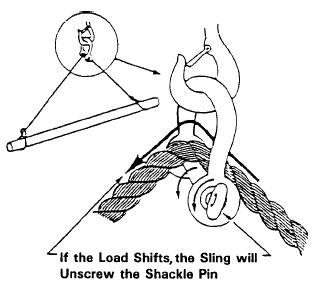
Further, you should never have something pulling through an anchor shackle against the pin, where the friction could work to unscrew it:
Because there are so many ways to get it wrong, I'm not a big fan of anchor shackles for bondage rigging, although I will occasionally use them (in pairs, for redundancy) when vertical height is at a premium and a carabiner would take up too much space.
Anchors into Concrete
Concrete ceilings are the bane of rope suspension. Properly installing an anchor into a concrete ceiling is a technically complex task, and there is no way to tell from visual inspection whether it was done properly. Improperly selected, installed, or loaded anchor bolts will often appear perfectly solid right up until the moment they let loose completely. Even if a bolt was installed properly, the quality of the concrete it was installed into may not be sufficient. Multiple bolts may fail simultaneously if they are underrated or the concrete is weak; quantity alone doesn't provide quality.
In short, anchors into concrete should be avoided whenever possible, and approached with maximum suspicion. The vast majority of concrete anchors in public kink venues I have been to were either clearly not properly designed, or nobody had knowledge of how they were installed.
Did you find something on the internet about how actually it's not that hard to install anchors into concrete? Please read this comment by Jim Duvall, a much greater expert than I in such matters, to dispel you of the notion.
Hoists
While in no way necessary for suspension, hoists open up a whole extra set of fun possibilities -- but also some new dangers:
- Most people do not have the expertise to inspect the condition of a hoist, so you’re often relying on the conscientiousness of whoever owns the equipment.
- When using electric hoists, you need to consider how you’d get down in an emergency where the power went out.
- Hoists that use wire rope can sometimes jam in a way where the wire gets bent and wraps in the reverse direction, so that the load goes up when the hoist is operated in the “down” direction. This jam can later unstick itself, unspooling a bunch of wire and creating a sudden free-fall drop of up to several feet. The jam may have been created by the previous operator, and left lying in wait for you. I’m not aware of any practical way to really protect against this.
- A hoist mounted above you may fall on you if its mounting fails; this is particularly likely when subjected to a drop producing forces many times in excess of the expected load, as described above.
For all of these reasons, I personally prefer to use rope and pulleys if I want to be able to adjust the height of my ring during suspension.
Note that while “hoist” and “winch” are often used interchangeably in casual conversation, technically a winch is a device designed to pull something along the ground, whereas a hoist is designed to hold weight suspended in the air. Never suspend from a device that is labeled as a winch.
Evaluating Your Partner’s Evaluation
Sometimes your partner may be more equipped to evaluate a hardpoint than you are, by virtue of specific foreknowledge of the equipment, or special relevant expertise. That doesn’t mean you need to take their conclusions on faith, however. If someone tells you something is safe, always ask them how they figured that out, and listen carefully to their answer.
Is their justification for the safety of the point based on specific evidence they collected, or assumptions they are making? Does it contain aspects of the Two Big Guys test? Does it consider every element of the system whose failure would result in a fall? When you ask them for more details, are they excited to share all the interesting technical minutia, or do they start to get defensive?
How Much Load to Expect
Earlier, I mentioned the design goal of having a 10x safety factor between the breaking strength of your hardpoint, and the load you expect to put on it. So that begs the question, how much load should you expect to put on it?
For most suspensions, the maximum load on the hardpoint occurs when you are hoisting up your bottom using a rope redirected through the ring -- i.e. you are pulling down to make them go up. To account for this setup, you should assume the load on the ring may be your bottom's weight plus your weight; i.e. if you weigh 200 lb, and your bottom weighs 150 lb, your hardpoint should have a minimum strength of 3500 lb.
Dynamic forces from your bottom swinging are unlikely to exceed the above guideline; however if you are going to jump on your bottom and swing together, or if you're doing any sort of drop which shock-loads the system, you'll want to further increase your safety margin.
Reasons You Might Still Want to Test Load Your Rig
You'll often see people (including me) give their ring a quick test hang after they finish rigging it. Assuming they're not believers in the Two Big Guys method of hardpoint evaluation, there are some other reasons to do this that are actually rational. One of them is to take any slack out of the rigging -- e.g. from knots in a piece of webbing used to hang the ring. Another is to verify that your rigging is behaving the way you expect, for example to see that the various components are evenly loaded, or observe how it responds to different angles of force.
Risk Mitigation
If you feel any doubt whatsoever in the reliability of a hardpoint, consider what the consequences would be of a failure. Sometimes you may want to take steps to mitigate the risks -- such as suspending low to the ground, avoiding inversions, or putting a mat down. And of course the safest thing is to tie on the floor instead, and look for a better hardpoint (or better information about the hardpoint) for next time.
One risk mitigation strategy you should view with skepticism is partial suspension -- a partial suspension off a sketchy hardpoint has the potential to be just as dangerous as a full suspension, not least because partials so easily turn into full suspension with the shift of a limb.
Another strategy to approach with caution is backing up one sketchy hardpoint with another sketchy hardpoint. It’s actually quite technically complex to rig from multiple hardpoints in a way that provides meaningful redundancy. Two hardpoints used together are generally less than twice as strong as one; remember that you’re looking for something that can support ten times the expected load. Redundancy is never a bad idea per se, but if you feel that your hardpoint needs a backup, you probably ought to be finding one you have more confidence in.